Django は、
- DRY (Don't Repeat Yourself) の精神
- Python 製の MVC フレームワーク(All-in-One & Pluggable)
- BSDライセンスの OSS
- O/R マッピング API
- 強力なテンプレートエンジン
- ユーザ認証・セッション
- 国際化
などの特徴を備えた Webフレームワークです。
Python 製の Webフレームワークとしては、現在ほぼ一択になっていると言ってもいいのではないでしょうか。実際使っていても、足りないところはあまり無いように感じます。
現時点での最新バージョンは、1.6.5 ですが、もうすぐ 1.7 にバージョンアップする予定となっています。
(2014/9/3 追記:9/2 にようやく、バージョン 1.7 がリリースされました!)
(参考)
- The Web framework for perfectionists with deadlines | Django
- Django の復習と予習1.7まで (第43回)Python mini Hack-a-thon:ある nakagami の日記:So-netブログ
今回は、バージョンが 1.7 にアップグレードされる前に、Django の使い方をおさらいしておこうと思います。
「Python Django入門 (3) - Qiita」によると、
- Django at a glance | Django documentation (日本語翻訳版)
- Writing your first Django app, part 1 | Django documentation (日本語翻訳版)
- Writing your first Django app, part 2 | Django documentation (日本語翻訳版)
- Writing your first Django app, part 3 | Django documentation (日本語翻訳版)
- Writing your first Django app, part 4 | Django documentation (日本語翻訳版)
は読んでおいた方がよいとのこと。
ただし、日本語翻訳版は Django のバージョンが 1.4 と若干古いので注意が必要です。
なお、チュートリアルで使用するソースコードの最終版は、
https://github.com/Chive/django-poll-app
にあるので、参考にしてください(公式のものではないようですが・・)。
目的
Django の以下の機能の使い方を復習する。
- アプリケーションの雛形作成
- データベース
- テンプレート
- 管理サイトの作成
- 国際化とローカライズ
環境
- Ubuntu 12.04 (on Vagrant hosted by Mac OS)
Vagrant で Ubuntu 12.04 を起動して、SSHで乗り込む
### 仮想マシンを起動
$ cd Vagrant/precise64/
$ vagrant up

### SSHで接続
$ ssh vagrant@192.168.33.10
vagrant@192.168.33.10's password: (vagrant)
VirtualBox、Vagrant がインストール済みで、Vagrantfile で IPアドレスを「192.168.33.10」で設定済みの前提です。このあたりは、「Mac OS X+Vagrant+VirtualBox で Ubuntu 12.04 仮想環境を構築」を参考にしてください。
pip, virtualenv, virtualenvwrapper をインストール
$ lsb_release -d
Description:    Ubuntu 12.04 LTS
$ python --version
Python 2.7.3

### pip をインストール
$ sudo apt-get update
$ sudo apt-get -y install python-pip
$ pip --version
pip 1.0 from /usr/lib/python2.7/dist-packages (python 2.7)
$ sudo pip --version
pip 1.0 from /usr/lib/python2.7/dist-packages (python 2.7)

### pip のバージョンが古いのでアップデート
$ sudo pip install -U pip
### このままでは使えないので再起動
$ sudo reboot

$ pip --version
pip 1.5.6 from /usr/local/lib/python2.7/dist-packages (python 2.7)
$ sudo pip --version
pip 1.5.6 from /usr/local/lib/python2.7/dist-packages (python 2.7)

$ sudo pip install virtualenv virtualenvwrapper
$ virtualenv --version
1.11.6
$ which virtualenvwrapper.sh
/usr/local/bin/virtualenvwrapper.sh

### virtualenv環境の設定
$ cat << EOF >> ~/.bash_profile

if [ -f ~/.bashrc ]; then
    . ~/.bashrc
fi
EOF

$ cat << EOF >> ~/.bashrc

source /usr/local/bin/virtualenvwrapper.sh
export WORKON_HOME=~/.virtualenvs
EOF

$ source ~/.bashrc
virtualenv環境で Django サイトを作成
Django ベストプラクティス によると、
我々は慣例的に本番サイトを /opt/webapps/
で、開発用サイトを ~/webapps/ でホストします。
ということなので、「/opt/webapps/
### virtualenv環境を作成
$ mkvirtualenv mysite

### Django をインストール
(mysite)$ pip install django
(mysite)$ pip list | grep Django
Django (1.6.5)

### /opt/webapps配下に Djangoサイトを作成
(mysite)$ sudo mkdir -p /opt/webapps
(mysite)$ sudo chown `whoami`. /opt/webapps
(mysite)$ cd /opt/webapps/
(mysite)$ django-admin.py startproject mysite
(mysite)$ tree /opt/webapps
/opt/webapps
`-- mysite
    |-- manage.py
    `-- mysite
        |-- __init__.py
        |-- settings.py
        |-- urls.py
        `-- wsgi.py
「はじめての Django アプリ作成、その 1 — Django 1.4 documentation」に、各ファイル・ディレクトリについての説明がありました。
- 外側の mysite/ ディレクトリは、このプロジェクトのただの入れ物です。 名前は Django に関係しませんので、好きな名前に変更できます。
- manage.py: Django プロジェクトに対する様々な操作を行うための コマンドラインユーティリティです。詳しくは django-admin.py と manage.py を参照してください。
- 内側の mysite/ ディレクトリは、このプロジェクトの本当の Python パッケージです。この名前が Python パッケージの名前であり、 import の際に 使用する名前です (例えば import mysite.settings) 。
- mysite/__init__.py: このディレクトリが Python パッケージであることを Python に知らせるための空のファイルです。(Python の初心者は、 Python の公式 ドキュメントの パッケージの詳しい説明 を読んで下さい。)
- mysite/settings.py: Django プロジェクトの設定ファイルです。 設定の仕組みは Django の設定 を参照してください。
- mysite/urls.py: Django プロジェクトの URL 宣言、いうなれば Django サイトにおける「目次」に相当します。詳しくは URL ディスパッチャ を参照 してください。
- mysite/wsgi.py: WSGI互換のある Web サーバでプロジェクトを動かすための エントリーポイントです。詳しくは WSGI 環境にデプロイする方法 を参照 してください。
Django を起動してみます。
(mysite)$ cd mysite/
(mysite)$ python manage.py runserver 0.0.0.0:8000
ブラウザから
http://192.168.33.10:8000/
にアクセスして、「It worked!」が表示されればひとまずOK。

このあたりは、「Ubuntu+virtualenv環境で Djangoアプリケーションを作ってみる」を参照にしてください。
データベースの設定
mysite/settings.py で、データベースの設定が SQLite になっていることを確認します。
mysite/settings.py(抜粋)
# Database
# https://docs.djangoproject.com/en/1.6/ref/settings/#databases

DATABASES = {
    'default': {
        'ENGINE': 'django.db.backends.sqlite3',
        'NAME': os.path.join(BASE_DIR, 'db.sqlite3'),
    }
}
MySQLの場合は、以下のように変更します。
# Database
# https://docs.djangoproject.com/en/1.6/ref/settings/#databases

DATABASES = {
    'default': {
        'ENGINE': 'django.db.backends.mysql',
        'HOST': 'localhost',
        'NAME': 'testdb',
        'USER': 'admin',
        'PASSWORD': 'adminpass',
        'PORT': '3306',
    }
}
ここで、ついでに TIME_ZONE にタイムゾーンをセットしておきます。
(修正前)
# Internationalization
# https://docs.djangoproject.com/en/1.6/topics/i18n/

LANGUAGE_CODE = 'en-us'

TIME_ZONE = 'UTC'
(修正後)
# Internationalization
# https://docs.djangoproject.com/en/1.6/topics/i18n/

LANGUAGE_CODE = 'ja'

TIME_ZONE = 'Asia/Tokyo'
(参考)
syncdb を使って、データベースを自動生成します。(MySQL の場合はこの前にデータベースを準備しておきます。)
(mysite)$ python manage.py syncdb
  ・
  ・
Would you like to create one now? (yes/no): yes
Username (leave blank to use 'vagrant'): admin
Email address:
Password: adminpass
Password (again): adminpass
Superuser created successfully.
Installing custom SQL ...
Installing indexes ...
Installed 0 object(s) from 0 fixture(s)
「db.sqlite3」が作成されました。
(スーパーユーザは「admin/adminpass」で設定しました。)
アプリケーション
「Writing your first Django app, part 1 | Django documentation | Django」を手本に、polls アプリケーションを追加していきます。(日本語翻訳版でもいいのですが、Djangoのバージョンが 1.4 と若干古いので、オリジナル版を参照した方がよいと思います。)
1)polls アプリケーションの雛形を作成
startapp を実行すると、pollsアプリケーションの雛形が生成されます。
(mysite)$ python manage.py startapp polls
(mysite)$ tree /opt/webapps/mysite
/opt/webapps/mysite
|-- db.sqlite3
|-- manage.py
|-- mysite
|   |-- __init__.py
|   |-- settings.py
|   |-- urls.py
|   `-- wsgi.py
`-- polls
    |-- admin.py
    |-- __init__.py
    |-- models.py
    |-- tests.py
    `-- views.py
ここで、mysite/settings.py の「INSTALLED_APPS」に「polls」を追加しておきます。(次の「データモデルの作成」などで必要になります。)
mysite/settings.py
# Application definition

INSTALLED_APPS = (
    'django.contrib.admin',
    'django.contrib.auth',
    'django.contrib.contenttypes',
    'django.contrib.sessions',
    'django.contrib.messages',
    'django.contrib.staticfiles',
    'polls',
)
2)データモデルの作成
データモデルの開発サイクルにあたっては、
- データモデルを models.py でコーディング
- python manage.py syncdb
という手順を取ることで、わざわざ CREATE文や ALTER文を用意しなくても、データモデルの変更に応じてテーブルを変更したりすることができるので、開発が楽になります。
では、進めていきます。
まず、polls/models.py にモデルを書いていきます。
polls/models.py
from django.db import models

class Poll(models.Model):
    question = models.CharField(max_length=200)
    pub_date = models.DateTimeField('date published')

    def __unicode__(self):
        return self.question


class Choice(models.Model):
    poll = models.ForeignKey(Poll)
    choice = models.CharField(max_length=200)
    votes = models.IntegerField()

    def __unicode__(self):
        return self.choice
syncdb でデータベースを同期します。
(mysite)$ python manage.py syncdb
実行後、polls_choiceテーブルと polls_pollテーブルがちゃんと追加されていました。
$ sqlite3 db.sqlite3
sqlite> .tables
auth_group                  django_admin_log
auth_group_permissions      django_content_type
auth_permission             django_session
auth_user                   polls_choice
auth_user_groups            polls_poll
auth_user_user_permissions
なお、事前に、
(mysite)$ python manage.py sql poll
を実行することで、発行される SQL をチェックすることもできます。
3)リクエストへの応答を作成
pollsアプリケーションで、リクエストに応じた応答をさせるようにしていきます。
以下の3ファイルを新規追加・修正します。
- poll/views.py
- polls/urls.py (新規追加)
- mysite/urls.py
polls/views.py を以下のように書き換えます。
from django.http import HttpResponse

from polls.models import Poll

def index(request):
    return HttpResponse("Hello, world. You're at the poll index.")

def detail(request, poll_id):
    return HttpResponse("You're looking at poll %s." % poll_id)

def results(request, poll_id):
    return HttpResponse("You're looking at the results of poll %s." % poll_id)

def vote(request, poll_id):
    return HttpResponse("You're voting on poll %s." % poll_id)
View関数が返すものを、HttpResponse か例外となるようにします。
次に、リクエストを受け取る polls/urls.py を新規作成します。
from django.conf.urls import patterns, url

from polls import views

urlpatterns = patterns('',
    # ex: /polls/
    url(r'^$', views.index, name='index'),
    # ex: /polls/5/
    url(r'^(?P<poll_id>\d+)/$', views.detail, name='detail'),
    # ex: /polls/5/results/
    url(r'^(?P<poll_id>\d+)/results/$', views.results, name='results'),
    # ex: /polls/5/vote/
    url(r'^(?P<poll_id>\d+)/vote/$', views.vote, name='vote'),
)
ここで、url() を少し説明すると、
url(regex, view, kwargs=None, name=None, prefix='')
- regex
regex には、正規表現形式でリクエストURLを指定します。
「(?P<poll_id>\d+)」という形で記述することで、View関数に渡す引数を指定することができます。
- view
view には、リクエストURL に対応する views.py の関数(view function)を指定します。
- kargs
kargsは、「URL dispatcher | Django documentation | Django」のように使います。
例えば、urlpatterns = patterns('blog.views', url(r'^blog/(?P<year>\d{4})/$', 'year_archive', {'foo': 'bar'}), )と定義されていて、「http://192.168.32.10:8000/blog/2005/」というリクエストがあった場合には、blog.views.year_archive という関数が、year_archive(request, year='2005', foo='bar') という引数で呼び出されます。
- name
name は、View関数が同じ URLが URLconfs に複数存在する場合、つまり View関数名から一意に URLを逆引きできない場合に指定するためのものです。
詳しくは、「URL dispatcher | Django documentation | Django」を参照。
最後に、mysite/urls.py に polls/urls.py への include を以下のように追記します。
from django.conf.urls import patterns, include, url

from django.contrib import admin
admin.autodiscover()

urlpatterns = patterns('',
    url(r'^polls/', include('polls.urls')),
    url(r'^admin/', include(admin.site.urls)),
)
4)テンプレートファイルを使う
次は、テンプレートファイルを使った画面表示方法についてです。
Django は、
(Using loader django.template.loaders.filesystem.Loader)
1: /opt/webapps/mysite/templates/polls/index.html
(Using loader django.template.loaders.app_directories.Loader)
2: /home/vagrant/.virtualenvs/mysite/local/lib/python2.7/site-packages/django/contrib/admin/templates/polls/index.html
3: /home/vagrant/.virtualenvs/mysite/local/lib/python2.7/site-packages/django/contrib/auth/templates/polls/index.html
4: /opt/webapps/mysite/polls/templates/polls/index.html
の順にテンプレートファイルを探しに行く仕様になっているので、テンプレートファイルは mysite 配下の、
- templates/polls/index.html
- polls/templates/polls/index.html
のどちらかに置くのがよいでしょう。
ここでは、チュートリアルに沿って、polls/templates/polls/index.html にテンプレートファイルを作成していきます。
以下の2ファイルを新規追加・修正します。
- polls/templates/polls/index.html(新規追加)
- polls/views.py
ディレクトリを作成しておくのを忘れずに。
mkdir -p polls/templates/polls
polls/templates/polls/index.html
{% if latest_poll_list %}
    <ul>
    {% for poll in latest_poll_list %}
        <li><a href="/polls/{{ poll.id }}/">{{ poll.question }}</a></li>
    {% endfor %}
    </ul>
{% else %}
    <p>No polls are available.</p>
{% endif %}
polls/views.py
from django.shortcuts import render_to_response

from polls.models import Poll

def index(request):
    latest_poll_list = Poll.objects.all().order_by('-pub_date')[:5]
    context = {'latest_poll_list': latest_poll_list}
    return render_to_response('polls/index.html', context)
テンプレートファイルに渡す context は、テンプレート変数名を Pythonオブジェクトに対応付けた辞書になっています。
現時点のファイル構成は、以下のようになっているはず。
$ tree /opt/webapps/mysite
/opt/webapps/mysite
|-- db.sqlite3
|-- manage.py
|-- mysite
|   |-- __init__.py
|   |-- settings.py
|   |-- urls.py
|   `-- wsgi.py
`-- polls
    |-- admin.py
    |-- __init__.py
    |-- models.py
    |-- templates
    |   `-- polls
    |       `-- index.html
    |-- tests.py
    |-- urls.py
    `-- views.py
なお、テンプレートでは、次のようなタグが使えます。
- {% if %} {% elif %} {% else %} {% endif %} タグ
- {% for %} {% endfor %} タグ
- {% url %} タグ
- {% block %} {% extends %} タグ
(参考)
{% url %} タグのサンプルはこちら。
polls/index.html
<li><a href="{% url 'detail' poll.id %}">{{ poll.question }}</a></li>
ただし、Django 1.5未満の場合は、
<li><a href="{% url detail poll.id %}">{{ poll.question }}</a></li>
とするか、
{% load url from future %}
を先頭行に付けるかしないと、エラーが発生するとのこと。
{% block %} {% extends %} タグについては、
https://docs.djangoproject.com/en/1.6/topics/templates/#template-inheritance
で詳細に解説されています。
5)フォームを使う
https://docs.djangoproject.com/en/1.6/intro/tutorial04/
フォームの書き方です。次の2ファイルを更新していきます。
- polls/detail.html
- polls/views.py
polls/detail.html
<h1>{{ poll.question }}</h1>

{% if error_message %}<p><strong>{{ error_message }}</strong></p>{% endif %}

<form action="{% url 'polls:vote' poll.id %}" method="post">
{% csrf_token %}
{% for choice in poll.choice_set.all %}
    <input type="radio" name="choice" id="choice{{ forloop.counter }}" value="{{ choice.id }}" />
    <label for="choice{{ forloop.counter }}">{{ choice.choice_text }}</label><br />
{% endfor %}
<input type="submit" value="Vote" />
</form>
polls/views.py
from django.shortcuts import get_object_or_404, render
from django.http import HttpResponseRedirect, HttpResponse
from django.core.urlresolvers import reverse
from polls.models import Choice, Poll
# ...
def vote(request, poll_id):
    p = get_object_or_404(Poll, pk=poll_id)
    try:
        selected_choice = p.choice_set.get(pk=request.POST['choice'])
    except (KeyError, Choice.DoesNotExist):
        # Redisplay the poll voting form.
        return render(request, 'polls/detail.html', {
            'poll': p,
            'error_message': "You didn't select a choice.",
        })
    else:
        selected_choice.votes += 1
        selected_choice.save()
        # Always return an HttpResponseRedirect after successfully dealing
        # with POST data. This prevents data from being posted twice if a
        # user hits the Back button.
        return HttpResponseRedirect(reverse('polls:results', args=(p.id,)))
6)クエリの発行(データベースの CRUD)
https://docs.djangoproject.com/en/1.6/topics/db/queries/
書き始めたらキリがないので、↑ を参照のこと。
管理サイトを作る
http://docs.djangoproject.jp/en/latest/intro/tutorial02.html
を手本に、管理サイトpolls アプリケーションを追加していきます。
なお、Django 1.6 から admin(管理サイト)がデフォルトで有効になっています。
(mysite)$ python manage.py startapp polls
すると自動で追加される polls/admin.py の正体は、管理サイト用のファイルなのです。
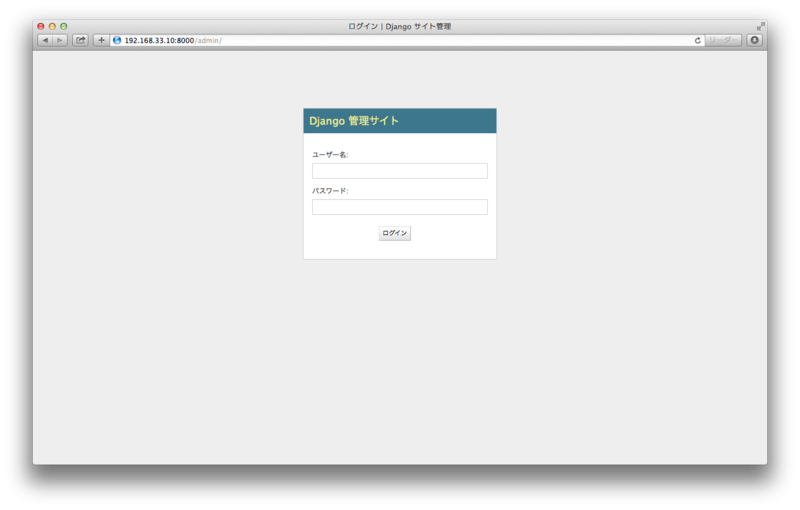
管理サイトを表示するには、
http://192.168.33.10:8000/admin/
にアクセスすれば OK です。

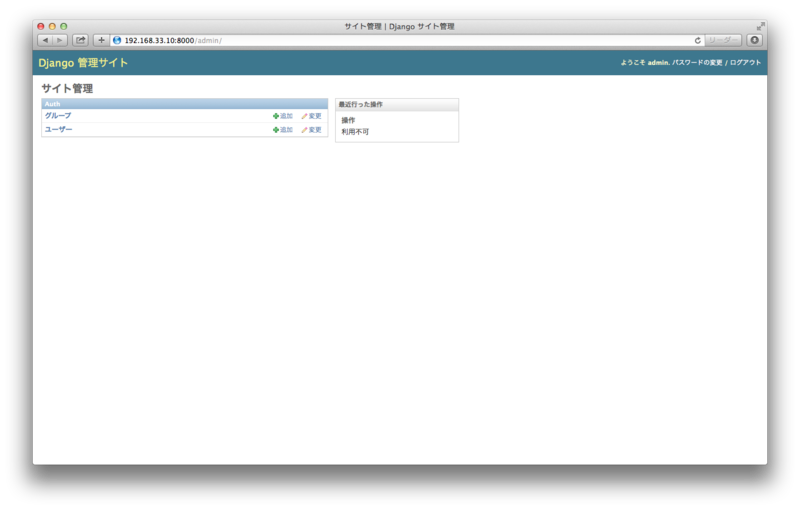
スーパーユーザの ID・パスワードでログインすると、

という画面が表示されるのですが、polls/admin.py に何も書いていない状態だと、まだ Poll や Choice は追加されていません。
polls/admin.py を追加し、
admin.site.register(Poll)
admin.site.register(Choice)
などと記述すると、管理サイトのページからGUIでCRUD操作ができるようになります。

国際化とローカライズ
https://docs.djangoproject.com/en/1.6/topics/i18n/translation/
1)Pythonコードの場合
関数 ugettext() を使います。タイプ数を減らすために、「 _ 」という別名で import するのが慣習的なやり方です。
(例)
polls/views.py
from django.http import HttpResponse
from django.utils.translation import ugettext as _

def index(request):
    return HttpResponse(_("Welcome to my site."))
2)テンプレートファイルの場合
テンプレートファイル内の翻訳では、{% trans %} タグを使います。
またファイルの先頭に、{% load i18n %} タグを入れておく必要があります。
なお、{% blocktrans %} タグを使うことで、プレースホルダを使用した複雑な文章を扱うことができます。
3)ローカライズ: 言語ファイルの作成方法
以下の手順で進めていきます。
- settings.py の「MIDDLEWARE_CLASSES」に「django.middleware.locale.LocaleMiddleware」を追加(初回のみ)
- django-admin.py makemessages を実行して、翻訳ファイル(poファイル)を作成
- poファイルを編集
- django-admin.py compilemessages を実行して、moファイルを作成
settings.py の「MIDDLEWARE_CLASSES」に「django.middleware.locale.LocaleMiddleware」を追加します。
mysite/settings.py
MIDDLEWARE_CLASSES = (
    ・
    ・
    'django.middleware.locale.LocaleMiddleware',
)
次の工程で makemessages を使うために、gettextをインストールしておきます。
$ sudo apt-get -y install gettext
$ gettext --version
gettext (GNU gettext-runtime) 0.18.1
翻訳ファイル(poファイル)を自動生成します。
### アプリケーションディレクトリ配下に移動
$ cd /opt/webapps/mysite/polls
### locale ディレクトリを作成
$ mkdir locale

### poファイルを自動生成
$ django-admin.py makemessages -l ja
processing locale ja
なお、ローカライズする対象文字列が一つも無いと、エラーになってしまいます。
CommandError: errors happened while running msguniq
msguniq: error while opening "/opt/webapps/mysite/polls/locale/django.pot" for reading: No such file or directory
poファイルを編集していきます。
polls/locale/ja/LC_MESSAGES/django.po
# SOME DESCRIPTIVE TITLE.
# Copyright (C) YEAR THE PACKAGE'S COPYRIGHT HOLDER
# This file is distributed under the same license as the PACKAGE package.
# FIRST AUTHOR <EMAIL@ADDRESS>, YEAR.
#
#, fuzzy
msgid ""
msgstr ""
"Project-Id-Version: PACKAGE VERSION\n"
"Report-Msgid-Bugs-To: \n"
"POT-Creation-Date: 2014-08-16 18:56+0000\n"
"PO-Revision-Date: YEAR-MO-DA HO:MI+ZONE\n"
"Last-Translator: FULL NAME <EMAIL@ADDRESS>\n"
"Language-Team: LANGUAGE <LL@li.org>\n"
"Language: \n"
"MIME-Version: 1.0\n"
"Content-Type: text/plain; charset=UTF-8\n"
"Content-Transfer-Encoding: 8bit\n"
"Plural-Forms: nplurals=1; plural=0;\n"

#: views.py:11
msgid "Welcome to my site."
msgstr "ようこそ"
poファイルをコンパイルして、moファイルを生成します。
$ django-admin.py compilemessages
processing file django.po in /opt/webapps/mysite/locale/ja/LC_MESSAGES
最後にサーバを再起動すると、翻訳が反映されます。

最終的なファイル構成はこうなります。
$ tree /opt/webapps/mysite
/opt/webapps/mysite
|-- db.sqlite3
|-- manage.py
|-- mysite
|   |-- __init__.py
|   |-- settings.py
|   |-- urls.py
|   `-- wsgi.py
`-- polls
    |-- admin.py
    |-- __init__.py
    |-- locale
    |   `-- ja
    |       `-- LC_MESSAGES
    |           |-- django.mo
    |           `-- django.po
    |-- models.py
    |-- templates
    |   `-- polls
    |       `-- index.html
    |-- tests.py
    |-- urls.py
    `-- views.py
(参考)
その他
その1)対話シェル
Django の設定を読み込みんだ対話シェルを起動するには、以下のようにします。
(mysite)$ cd /opt/webapps/mysite/
(mysite)$ python manage.py shell
Python 2.7.3 (default, Apr 20 2012, 22:39:59)
[GCC 4.6.3] on linux2
Type "help", "copyright", "credits" or "license" for more information.
(InteractiveConsole)
>>>
(参考)
その2)South
Django に含まれているわけではないのですが、Django と非常に親和性の高いマイグレーションツール。
しかしながら、Django 1.7 では migration がパワーアップして South と同等の機能を提供してくれるようになるので、1.7 からはサヨナラな感じになってしまうでしょうか。
(参考)